

MICROBITE CAPI · WOOCOMMERCE SETUP
Set up Meta CAPI for your WooCommerce store.
Connect your Meta dataset, save your token privately and test a WooCommerce order. Follow the seven-step Setup Assistant or this illustrated guide through browser tracking, Purchase verification and optional GA4.
Instructions updated for Microbite CAPI v1.8.6. Fresh Credentials and Setup Assistant captures show the current interface; captions identify earlier proof images. Copy complete website prompts into ChatGPT, Claude or your preferred AI assistant.
SureCart integration: private beta
The customer download remains Microbite CAPI 1.8.6 for WooCommerce. The optional SureCart integration is being verified privately in the 1.9.0 beta, requiring PHP 8.1 or newer. It is not yet a completed customer release.
Supported scope: paid one-time SureCart checkouts. Subscriptions, trials and installments are excluded. Refund tracking and revenue reversals are not supported. SureCart has its own adapter and GTM-MICROBITE-SURECART.json; WooCommerce and GTM4WP are not required. Start in Preview, then use SureCart’s Test processor, CAPI Test Mode and the current Meta test-event code for an approved fresh test purchase.
Verified on 10 October 2026: controlled simulated A$1 SureCart guest tests exercised the selected merchant policy. A fresh checkout with Pressidium inactive and no visitor opt-in produced Meta server Purchase acceptance (HTTP 200), correctly labelled merchant_authorized. Browser advertising and analytics remained denied, and the data-layer event matched the server event ID, value and currency. Separate guest tests verified server acceptance with advertising chosen, and blocked explicit advertising refusal and withdrawal before payment without a Meta request or backfill. Earlier beta.3 testing also established a Processed Server row in Meta Test Events. These results do not prove browser Pixel receipt, deduplication or GA4 receipt.
Choose your server Purchase policy
Open Microbite CAPI → CAPI Purchase policy, or use Change Purchase policy in CAPI Settings. This one setting applies to both WooCommerce and SureCart server Purchases.
- Require visitor consent: the default. Connect Pressidium, review its notice and explicitly enable the bridge. A valid pre-payment advertising grant is required; missing, refused, withdrawn or expired permission blocks server delivery.
- Australia-only store — send server Purchases without opt-in: an administrator can explicitly select this merchant-managed policy and confirm the store’s privacy basis, customer notice and opt-out handling. A cookie plugin is optional for this server policy. Fresh checkout ownership and pre-payment authorisation are still required; recorded advertising refusals and withdrawal are honoured.
The Australia-only option is site-wide; it does not detect a visitor’s country or automatically skip Australian visitors. With the checked Pressidium 1.9.1 integration it suppresses the automatic banner and keeps manual preferences available. Without a cookie plugin, a necessary, opaque ownership cookie still supports secure checkout binding. Browser Meta and analytics remain denied without their own explicit permission; selecting this policy does not enable or publish GTM tags.
Workers recheck the selected policy, ownership, expiry and available refusals. Saving a policy change invalidates earlier authorisations; old blocked Purchases are never replayed. Under the consent policy, reloading does not renew the six-hour server lease. Analytics remains separate from advertising.
Privacy notice: describe the actual data shared with Meta, its purpose, and how customers can object. SureCart server Purchases include order/item details, amount, currency and a hashed email identifier. Hashing does not by itself make the identifier anonymous. An Australia-only setting and a privacy-policy statement alone do not establish that every use is lawful; review the applicable obligations for your store. See the OAIC’s tracking guidance.
Install and configure Pressidium when using visitor consent
The candidate supports Pressidium Cookie Consent 1.9.1. Open Cookie consent setup from Microbite CAPI. Use its native WordPress install or activation action, review the banner and privacy notice, apply the recommended controls, then separately enable the bridge. The first Apply retains a backup of the original settings; restore with the bridge disabled. Installing a banner alone does not enable server delivery.
The recommended configuration disables native per-page consent recording and native Google Consent Mode; Microbite supplies its checked consent commands. Both supplied GTM templates keep tags paused and require the relevant permission. Review existing scripts and third-party consent integrations separately.
Change your cookie banner wording
You can edit the banner directly in Pressidium; no PHP or JavaScript changes are needed.
- In WordPress, open Cookie Consent → Translations.
- Choose Edit beside your active language, such as English.
- Expand (EN) Consent modal. Edit Title, Description, Primary button and Secondary button. These fields change the wording. Keep the Cookie settings button and your own privacy-policy link in the description.
- Use (EN) Settings modal and the category descriptions for fuller information about analytics, advertising providers such as Meta, server purchase sharing, contact identifiers and how to withdraw permission.
- Click Save, then use Preview Consent and Preview Settings. Check a fresh private-browser window on desktop and mobile, and try both accept and essential-only choices.
Example: “Help us improve your shopping experience” followed by “Optional cookies help us understand what shoppers find useful and measure ads with Meta, including purchase information. You can change your choice anytime.” Use Accept cookies and Essential only, with an accessible Cookie settings link.
Keep the opening message short and the full explanation easy to reach before someone chooses. This is suggested copy, not a prescribed legal sentence. Australia’s OAIC tracking guidance requires clear information about personal-information handling where the Privacy Act applies. For UK visitors, the ICO consent guidance supports concise, layered explanations while requiring informed, freely given choices.
Keep the controls intact: wording changes do not require switching on optional categories by default or removing the essential-only choice. Under Modals, preserve the configured accept-all primary action and accept-necessary secondary action. Consent is required by default. The explicitly selected Australia-only merchant policy suppresses the automatic Pressidium 1.9.1 banner while keeping manual preferences available. Recheck consent after changing the saved notice; previous server permissions may need reconfirmation.
Checks still required before a customer release
Fresh guest positive, refusal and withdrawal worker branches are verified on shop. A fresh paid Test checkout without a cookie plugin or visitor opt-in also received Meta server API acceptance while browser advertising and analytics stayed denied. Complete genuine six-hour expiry, concurrency/cache and cleanup checks; WooCommerce classic and Blocks runtime consent tests; browser Meta receipt/deduplication; and optional GA4 receipt. Replace the shop’s default privacy text with a notice describing its actual use. Keep CAPI Test Mode on and customer 1.8.6 unchanged during acceptance.
Your setup checklist
STEP 01
Install and prepare your store
Connect WooCommerce Purchase events to Meta, add browser tracking through Google Tag Manager, and optionally measure ecommerce in GA4. Follow the checks in order: a successful connection test confirms a diagnostic PageView; a test order is needed to verify Purchase delivery.
Before you begin
You need WordPress administrator access, an active WooCommerce store, your Microbite CAPI ZIP and licence, access to the intended Meta dataset, and a Google Tag Manager web container. Use a separate staging store and Meta test dataset for demonstrations.
Install and activate
In WordPress, open Plugins > Add Plugin > Upload Plugin. Choose the customer ZIP, install it and activate Microbite CAPI. Open WooCommerce > Manage License and activate your licence. Use the customer ZIP for v1.8.6. Fresh Credentials and Setup Assistant captures show v1.8.6; other captions identify earlier demo interfaces.
Use Setup Assistant
Open WooCommerce > Microbite CAPI > Setup Assistant. Follow the seven stages, their actions and expected results. Your selected stage and question resume within the browser session. Review and copy the message into your preferred AI assistant. The built-in Open ChatGPT button opens ChatGPT. You can also use the complete website prompts below without a download.
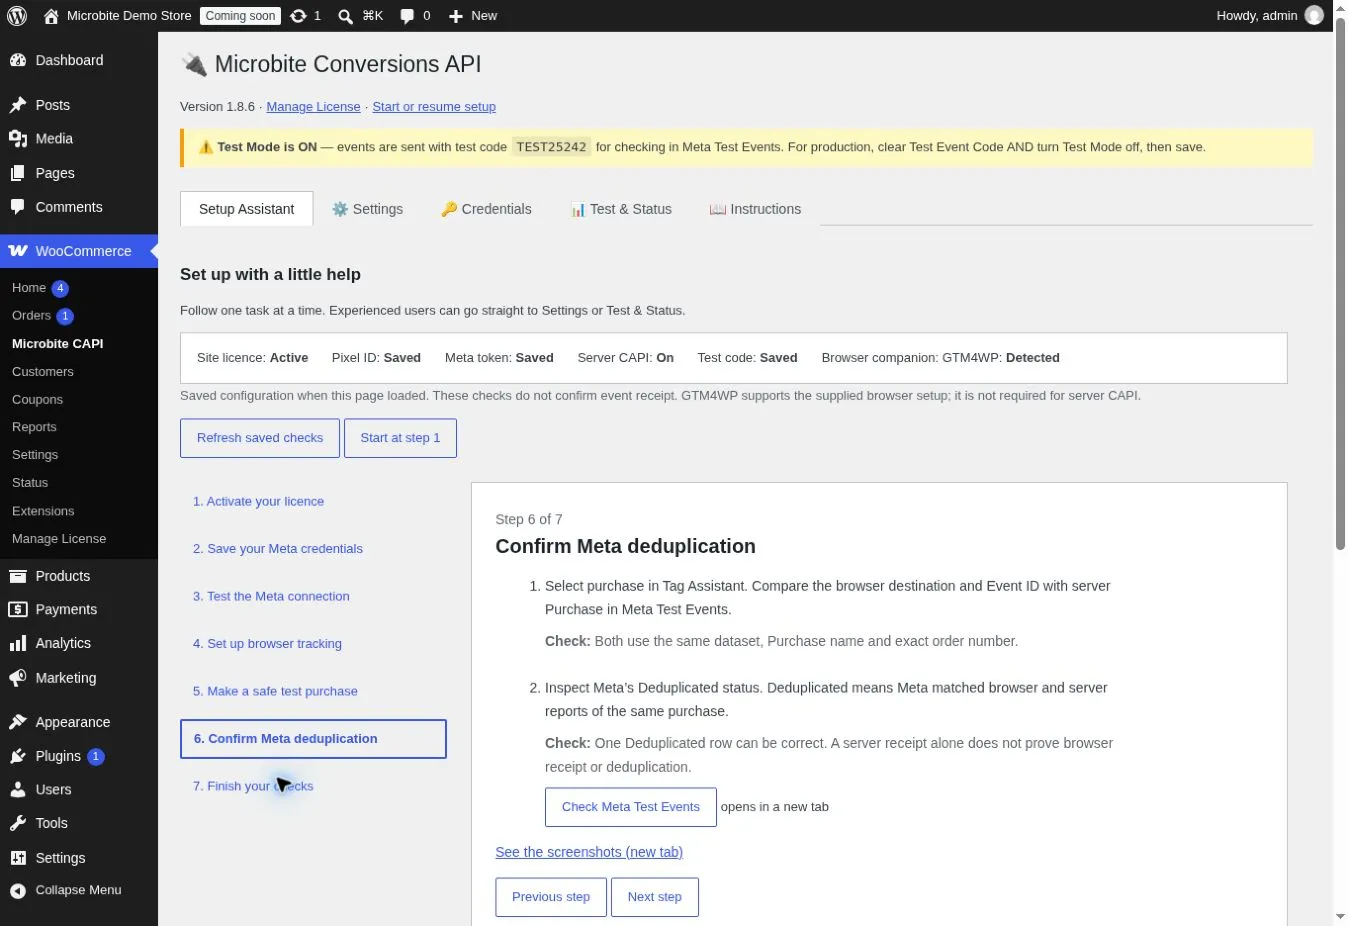
Microbite CAPI v1.8.6 Setup Assistant, captured 4 October 2026. Saved configuration, seven stages and the selected deduplication task are visible. Saved checks do not independently confirm event receipt.
Open the screenshot at full sizePixel or dataset ID
Purpose: Same Meta destination in CAPI and browser pixel
Example format: Digits
CAPI access token
Purpose: Saved privately in Credentials
Example format: Secret value
Test Event Code
Purpose: Routes server tests to Meta Test Events
Example format: TEST...
GTM container ID
Purpose: Loads the website tag container
Example format: GTM-...
GA4 Measurement ID
Purpose: Optional Analytics web stream
Example format: G-...
Use your own values
Screenshots show the isolated demo.microbite.com.au setup. Its IDs, test code and order numbers are examples, not values to copy into a customer installation. All order details shown are synthetic; no real payment or dispatch was involved.
AI-guided setup with your preferred assistant
Install and activate Microbite CAPI first, then use the first prompt to get help with the remaining setup. Each task below has a Copy prompt button and explains when to use it. Paste the complete prompt into ChatGPT, Claude or another AI assistant — no file download is needed.
- Install and activate Microbite CAPI. In WordPress, go to Plugins > Add Plugin > Upload Plugin, choose your customer ZIP, install it and click Activate. WooCommerce must also be active.
- Activate your site licence. Open WooCommerce > Manage License and activate your key privately in WordPress.
- Copy the first prompt below. Open “Start here — after installing the plugin” and click Copy prompt.
- Paste it into your AI chat and send it. Open ChatGPT, Claude or your preferred assistant, paste the copied text into the message box, then send it. Answer its questions and check each result in your own store.
Already partway through setup? Choose the task that matches where you are. Each prompt says when to use it.
AI guidance is optional and uses your own assistant account. Nothing is sent automatically, and copying a prompt gives the assistant no live access to your website. Keep tokens, licence keys and customer records out of anything you add. Confirm event receipt separately from saved configuration.
Start here — after installing the plugin
When to use this: After installing and activating Microbite CAPI. Start with this prompt for guided setup.
You are helping me set up Microbite CAPI for WooCommerce. Use this illustrated guide: https://shop.microbite.com.au/microbite-capi-setup-guide/ . If you cannot open it, ask me to paste the relevant section.

This prompt gives you no live access to WordPress, Meta, GTM or GA4 and contains no current site settings. Ask which plugin version I use and whether the store is demo, staging or production. Use my own configuration, not the guide's example IDs. Keep a dedicated demo in test mode.

Never request tokens, licence keys, passwords or customer records. Ask for redacted evidence when needed. Give one practical action and the result I should see, then wait for my reply. Do not mark event receipt complete without evidence.

My question: I have installed and activated Microbite CAPI on my WooCommerce store. Help me check the prerequisites and confirm my site licence is active, then guide me through the remaining setup. Start by asking whether this is demo, staging or production. Give me the first action and the result I should see.
Next: Open a chat in ChatGPT, Claude or your preferred AI assistant. Paste the copied prompt into the message box and send it. Answer its questions and follow one action at a time.
Save Meta credentials
When to use this: When you are ready to connect your own Meta Pixel or dataset and save the token privately in WordPress.
You are helping me set up Microbite CAPI for WooCommerce. Use this illustrated guide: https://shop.microbite.com.au/microbite-capi-setup-guide/ . If you cannot open it, ask me to paste the relevant section.

This prompt gives you no live access to WordPress, Meta, GTM or GA4 and contains no current site settings. Ask which plugin version I use and whether the store is demo, staging or production. Use my own configuration, not the guide's example IDs. Keep a dedicated demo in test mode.

Never request tokens, licence keys, passwords or customer records. Ask for redacted evidence when needed. Give one practical action and the result I should see, then wait for my reply. Do not mark event receipt complete without evidence.

My question: Help me save my own Meta Pixel or dataset ID in Settings and my access token privately in Credentials. Explain how to check that browser and server tracking use the same destination. Do not ask me to paste the token into this chat.
Next: Open a chat in ChatGPT, Claude or your preferred AI assistant. Paste the copied prompt into the message box and send it. Answer its questions and follow one action at a time.
Understand stars and Valid
When to use this: After saving a token, if you want to understand the stars, saved status or dated Valid badge.
You are helping me set up Microbite CAPI for WooCommerce. Use this illustrated guide: https://shop.microbite.com.au/microbite-capi-setup-guide/ . If you cannot open it, ask me to paste the relevant section.

This prompt gives you no live access to WordPress, Meta, GTM or GA4 and contains no current site settings. Ask which plugin version I use and whether the store is demo, staging or production. Use my own configuration, not the guide's example IDs. Keep a dedicated demo in test mode.

Never request tokens, licence keys, passwords or customer records. Ask for redacted evidence when needed. Give one practical action and the result I should see, then wait for my reply. Do not mark event receipt complete without evidence.

My question: The Credentials field shows ********. Explain the difference between Saved - verification needed and Valid with a check date, when the evidence expires, and how to keep the existing token when saving. Explain what this does and does not prove.
Next: Open a chat in ChatGPT, Claude or your preferred AI assistant. Paste the copied prompt into the message box and send it. Answer its questions and follow one action at a time.
Run the connection test
When to use this: After saving your Pixel / dataset ID and token, when you are ready for a staging connection test.
You are helping me set up Microbite CAPI for WooCommerce. Use this illustrated guide: https://shop.microbite.com.au/microbite-capi-setup-guide/ . If you cannot open it, ask me to paste the relevant section.

This prompt gives you no live access to WordPress, Meta, GTM or GA4 and contains no current site settings. Ask which plugin version I use and whether the store is demo, staging or production. Use my own configuration, not the guide's example IDs. Keep a dedicated demo in test mode.

Never request tokens, licence keys, passwords or customer records. Ask for redacted evidence when needed. Give one practical action and the result I should see, then wait for my reply. Do not mark event receipt complete without evidence.

My question: Help me configure Meta Test Events on a staging store and run Test Connection. Tell me how to check the diagnostic PageView result and what still needs separate Purchase testing.
Next: Open a chat in ChatGPT, Claude or your preferred AI assistant. Paste the copied prompt into the message box and send it. Answer its questions and follow one action at a time.
Investigate Missing Permission
When to use this: If Meta returns a Missing Permission error during the connection test.
You are helping me set up Microbite CAPI for WooCommerce. Use this illustrated guide: https://shop.microbite.com.au/microbite-capi-setup-guide/ . If you cannot open it, ask me to paste the relevant section.

This prompt gives you no live access to WordPress, Meta, GTM or GA4 and contains no current site settings. Ask which plugin version I use and whether the store is demo, staging or production. Use my own configuration, not the guide's example IDs. Keep a dedicated demo in test mode.

Never request tokens, licence keys, passwords or customer records. Ask for redacted evidence when needed. Give one practical action and the result I should see, then wait for my reply. Do not mark event receipt complete without evidence.

My question: Meta reports Missing Permission when I test the connection. Help me check the intended dataset, the app associated with the token and assigned dataset access, one check at a time. Do not assume that Full control is always required. Ask for a redacted error description only.
Next: Open a chat in ChatGPT, Claude or your preferred AI assistant. Paste the copied prompt into the message box and send it. Answer its questions and follow one action at a time.
Import and publish GTM
When to use this: When you are ready to configure browser tracking in GTM, before publishing changes.
You are helping me set up Microbite CAPI for WooCommerce. Use this illustrated guide: https://shop.microbite.com.au/microbite-capi-setup-guide/ . If you cannot open it, ask me to paste the relevant section.

This prompt gives you no live access to WordPress, Meta, GTM or GA4 and contains no current site settings. Ask which plugin version I use and whether the store is demo, staging or production. Use my own configuration, not the guide's example IDs. Keep a dedicated demo in test mode.

Never request tokens, licence keys, passwords or customer records. Ask for redacted evidence when needed. Give one practical action and the result I should see, then wait for my reply. Do not mark event receipt complete without evidence.

My question: Help me set up GTM4WP WooCommerce ecommerce tracking, back up my existing GTM container and Merge the supplied configuration. Guide me through reviewing conflicts, setting my own IDs, previewing and publishing. Ask what already exists before suggesting changes.
Next: Open a chat in ChatGPT, Claude or your preferred AI assistant. Paste the copied prompt into the message box and send it. Answer its questions and follow one action at a time.
Find a missing browser Purchase
When to use this: If a server Purchase is received but the matching browser Purchase is missing.
You are helping me set up Microbite CAPI for WooCommerce. Use this illustrated guide: https://shop.microbite.com.au/microbite-capi-setup-guide/ . If you cannot open it, ask me to paste the relevant section.

This prompt gives you no live access to WordPress, Meta, GTM or GA4 and contains no current site settings. Ask which plugin version I use and whether the store is demo, staging or production. Use my own configuration, not the guide's example IDs. Keep a dedicated demo in test mode.

Never request tokens, licence keys, passwords or customer records. Ask for redacted evidence when needed. Give one practical action and the result I should see, then wait for my reply. Do not mark event receipt complete without evidence.

My question: I can see a server Purchase but cannot find a browser Purchase. Help me inspect the selected purchase event in Tag Assistant and check the browser destination and Event ID. Ask what evidence I see before deciding that a tag is working.
Next: Open a chat in ChatGPT, Claude or your preferred AI assistant. Paste the copied prompt into the message box and send it. Answer its questions and follow one action at a time.
Check Meta deduplication
When to use this: After a fresh test purchase, when you can compare browser and server event evidence.
You are helping me set up Microbite CAPI for WooCommerce. Use this illustrated guide: https://shop.microbite.com.au/microbite-capi-setup-guide/ . If you cannot open it, ask me to paste the relevant section.

This prompt gives you no live access to WordPress, Meta, GTM or GA4 and contains no current site settings. Ask which plugin version I use and whether the store is demo, staging or production. Use my own configuration, not the guide's example IDs. Keep a dedicated demo in test mode.

Never request tokens, licence keys, passwords or customer records. Ask for redacted evidence when needed. Give one practical action and the result I should see, then wait for my reply. Do not mark event receipt complete without evidence.

My question: Meta shows one Deduplicated Purchase. Help me compare the browser and server destination, event name Purchase and exact Event ID, then check the receipt evidence. Explain why one Deduplicated row can be correct.
Next: Open a chat in ChatGPT, Claude or your preferred AI assistant. Paste the copied prompt into the message box and send it. Answer its questions and follow one action at a time.
Verify optional GA4
When to use this: After enabling optional GA4 ecommerce, when you are ready to check a received test purchase.
You are helping me set up Microbite CAPI for WooCommerce. Use this illustrated guide: https://shop.microbite.com.au/microbite-capi-setup-guide/ . If you cannot open it, ask me to paste the relevant section.

This prompt gives you no live access to WordPress, Meta, GTM or GA4 and contains no current site settings. Ask which plugin version I use and whether the store is demo, staging or production. Use my own configuration, not the guide's example IDs. Keep a dedicated demo in test mode.

Never request tokens, licence keys, passwords or customer records. Ask for redacted evidence when needed. Give one practical action and the result I should see, then wait for my reply. Do not mark event receipt complete without evidence.

My question: Help me inspect a received purchase in GA4 DebugView. Guide me through checking transaction_id, value, currency and items against a synthetic test order. Explain why a fired GTM tag alone does not confirm received revenue.
Next: Open a chat in ChatGPT, Claude or your preferred AI assistant. Paste the copied prompt into the message box and send it. Answer its questions and follow one action at a time.
Choose demo or production
When to use this: After verifying the test setup, to confirm whether the site should stay in demo mode or move to production.
You are helping me set up Microbite CAPI for WooCommerce. Use this illustrated guide: https://shop.microbite.com.au/microbite-capi-setup-guide/ . If you cannot open it, ask me to paste the relevant section.

This prompt gives you no live access to WordPress, Meta, GTM or GA4 and contains no current site settings. Ask which plugin version I use and whether the store is demo, staging or production. Use my own configuration, not the guide's example IDs. Keep a dedicated demo in test mode.

Never request tokens, licence keys, passwords or customer records. Ask for redacted evidence when needed. Give one practical action and the result I should see, then wait for my reply. Do not mark event receipt complete without evidence.

My question: Ask whether this site is a dedicated demo or a production store. Keep a dedicated demo in Test Mode with its test event code. If I explicitly confirm production, guide me through clearing Test Event Code and switching Test Mode off, then saving and rechecking. Do not mark external checks complete without evidence.
Next: Open a chat in ChatGPT, Claude or your preferred AI assistant. Paste the copied prompt into the message box and send it. Answer its questions and follow one action at a time.
Want your saved-status summary?
Open WooCommerce > Microbite CAPI > Setup Assistant, choose a question, review the full message and click Copy setup message. Paste the text into your preferred assistant. The plugin's Open ChatGPT button opens ChatGPT. The general website prompts above do not contain your current site settings.
STEP 02
Get your Meta access token
Open Meta Events Manager ↗1. Select the correct dataset. Sign in to Meta Events Manager with the Facebook account that has access to your business. Select the business portfolio and the dataset for your website, then copy its Pixel or dataset ID. This must match the Meta Pixel ID used by your browser tags.
A common starting point, then your own setup. The button above opens Events Manager. The business, dataset and token-generation screens shown after sign-in depend on your account and permissions. Select your own dataset; do not copy the demo IDs from these screenshots.
2. Open Settings. Find Conversions API and Set up direct integration. For a direct event submission setup, the captured interface provides Set up without Dataset Quality API, then Generate access token.
3. Generate and store the token privately. Complete Meta's prompts and keep the token in a password manager. Paste it directly into the plugin Credentials screen. Never include it in a screenshot, public page or GTM variable.
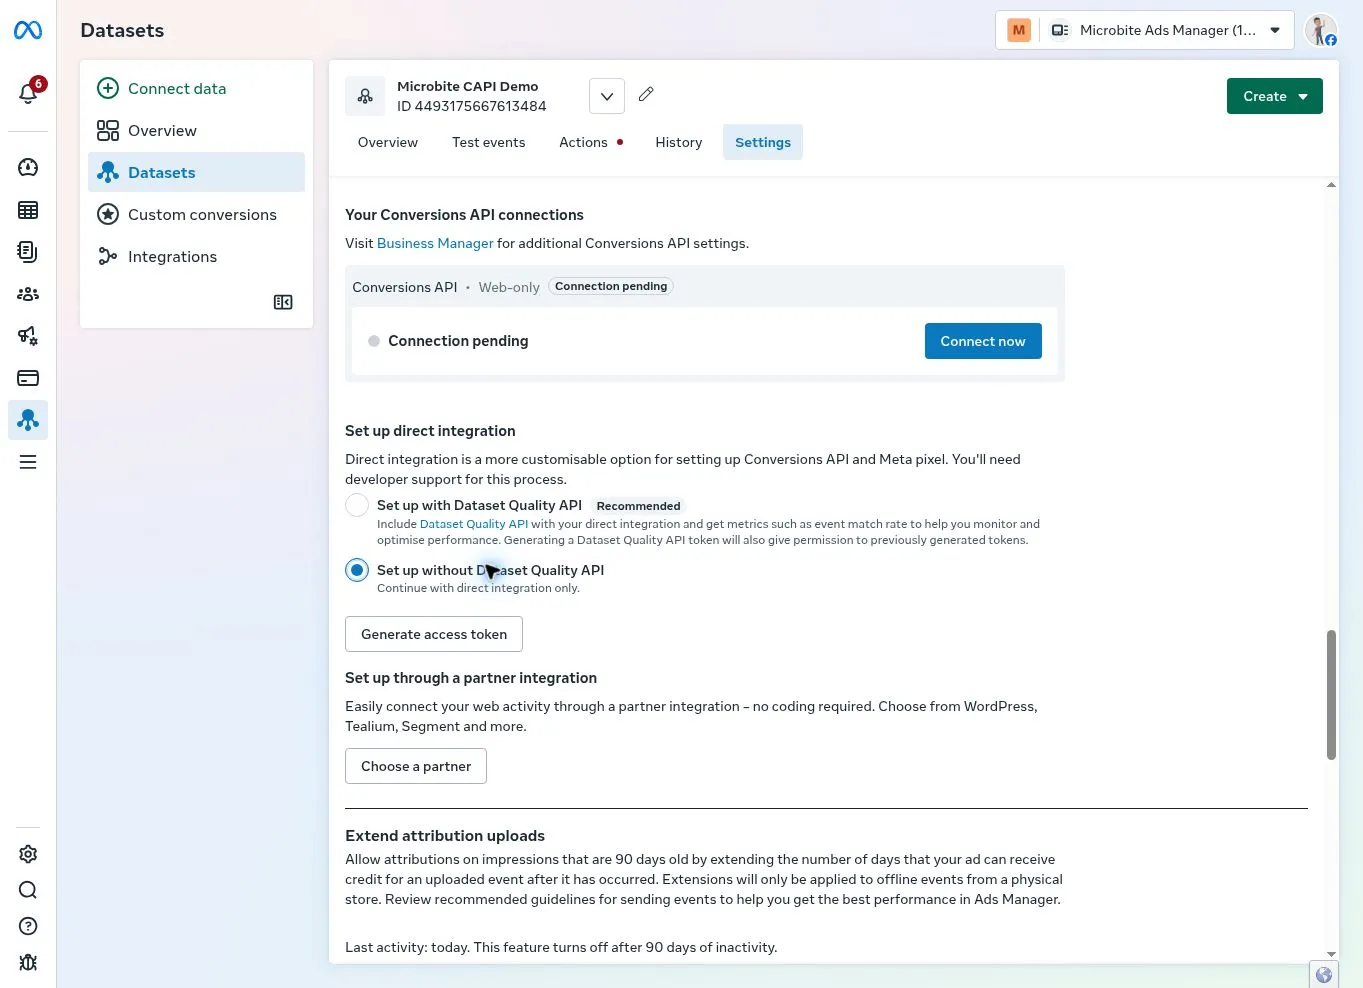
Meta Settings before token generation, captured 2 October 2026. No token is displayed. Controls may vary by business account.
Open the screenshot at full sizeIf you use a system user
Open Meta Business Settings (opens in a new tab), select your business, then look for Users > System users. An existing system user token can also be used when its app and assigned dataset access permit event submission. Check the app, dataset and token permissions together. A returning setup screen does not prove that a token failed, and a permissions error alone does not prove that Full control is required.
STEP 03
Save the token in Credentials
1. Save the destination. Open WooCommerce > Microbite CAPI > Settings. Enter your own Pixel ID and click Save Settings. General settings and token saving use separate tabs.
2. Save the secret. Open Credentials. Paste the Meta token into CAPI Access Token and click Save Access Token.
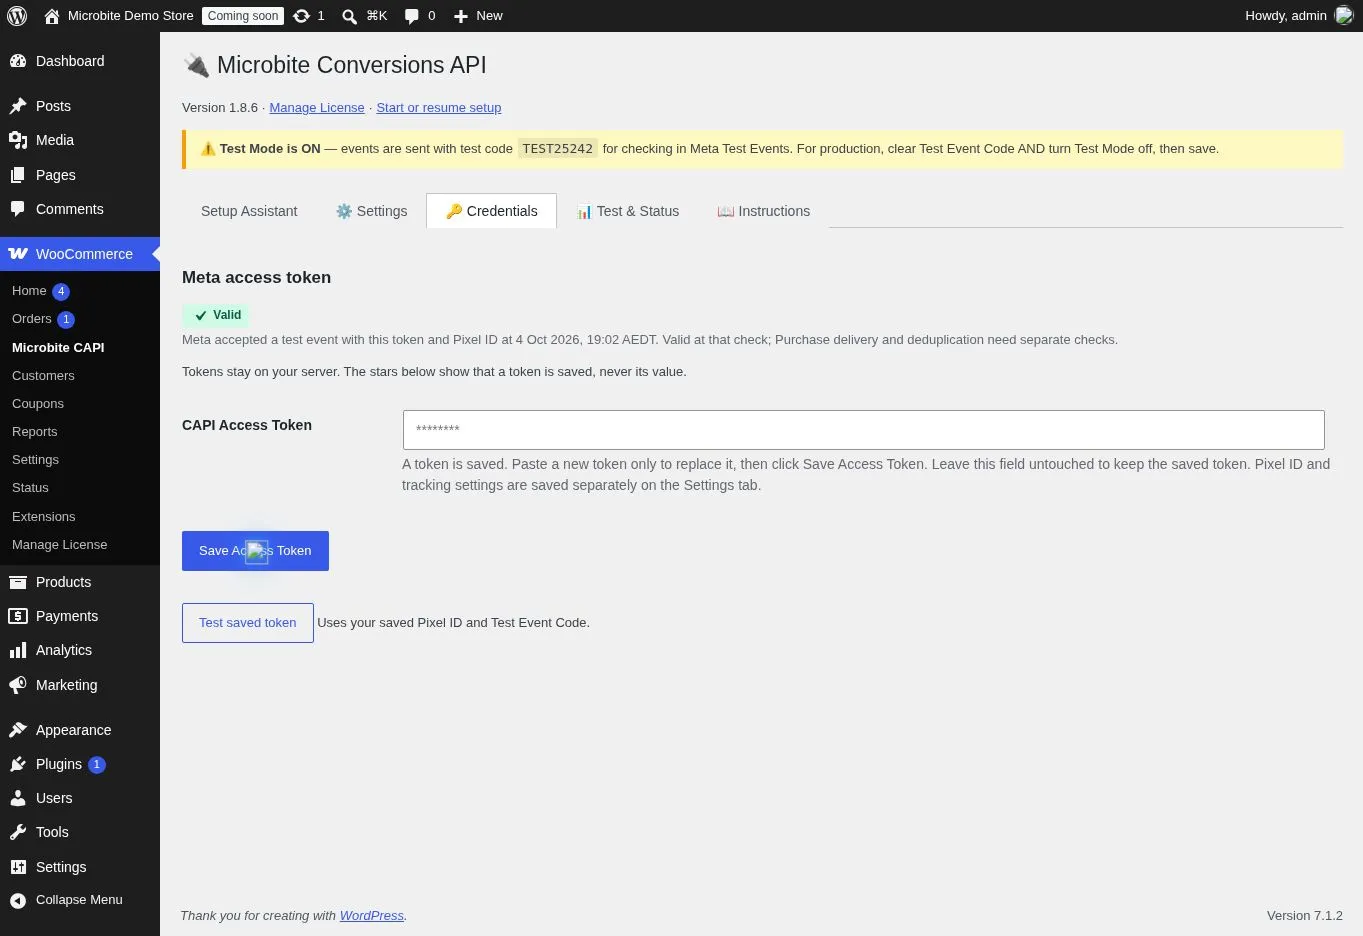
Microbite CAPI v1.8.6 Credentials, captured 4 October 2026. The saved-token field shows eight fixed stars and a Valid badge dated 19:02 AEDT after an accepted diagnostic PageView. No token value is displayed.
Open the screenshot at full sizeRead the mask and status. In v1.8.6, a saved token displays ********. These are placeholder stars; its value and length are never revealed. Leave the field untouched to keep the token. Paste a new token only to replace it. Saved - verification needed means storage is confirmed, but Meta acceptance needs a fresh check.
Check the saved token. Click Test saved token to open Test & Status. A successful diagnostic adds a dated Valid badge. This evidence expires after 24 hours and does not apply if the token or Pixel ID changes. Check failed can mean transport or permission problems; inspect the diagnostic result before replacing the token.
STEP 04
Test the connection before orders
1. Configure a test. In Meta Events Manager > Test events, copy the code for your selected dataset. In the plugin Settings, enable Test Mode, enter that Test Event Code, enable CAPI for the later order test, and save. Enable Debug Log temporarily to inspect test sends.
2. Run Test Connection. Open Test & Status, confirm the licence is active and the Pixel ID and token are saved, then click Test Connection. Test Connection submits a diagnostic PageView directly to Meta. Saving or viewing the token does not run an automatic test.
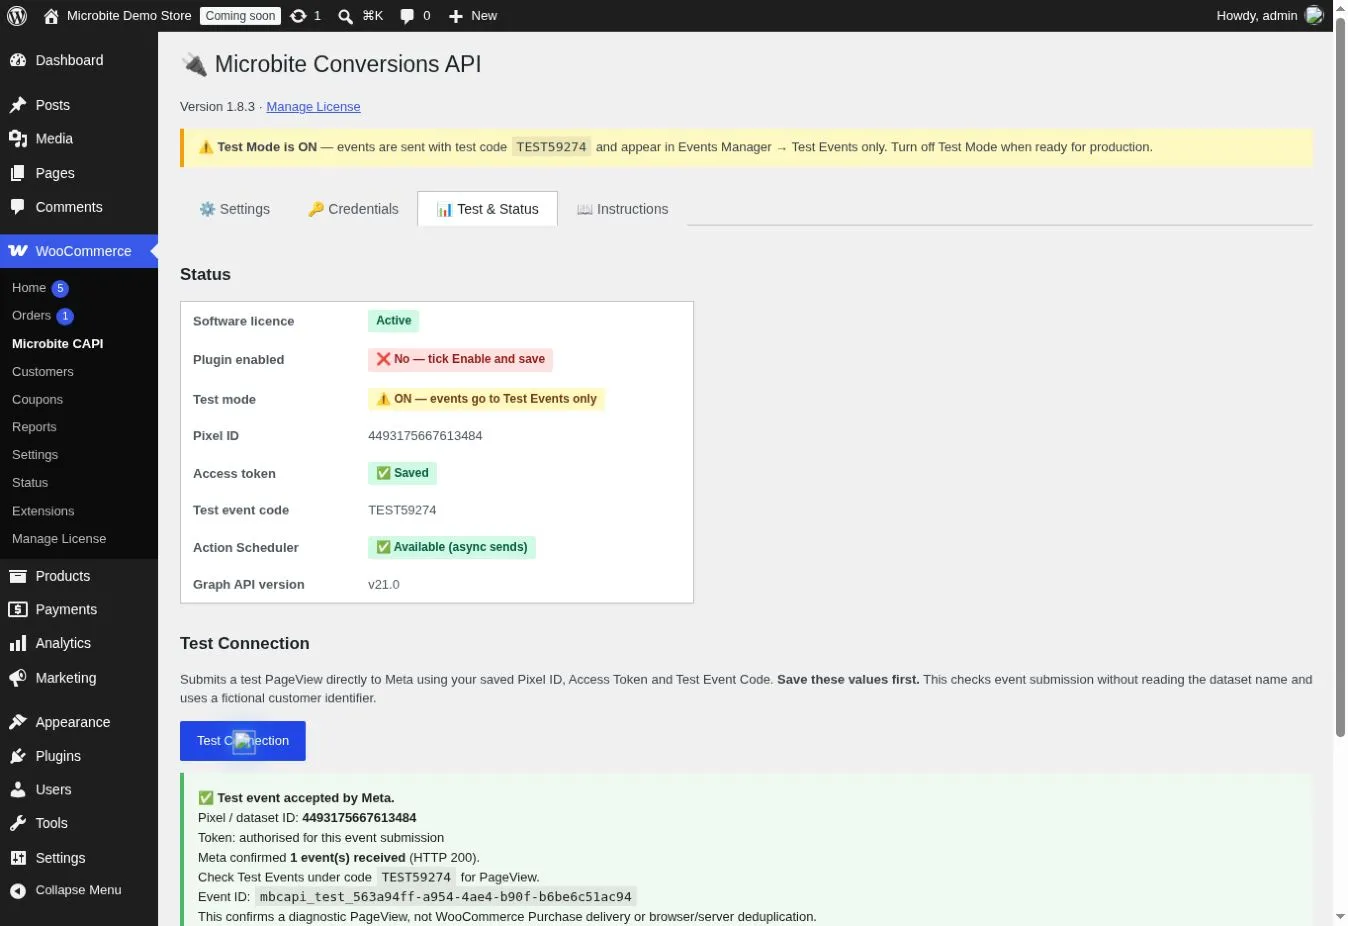
Earlier v1.8.3 demo: Meta accepted a diagnostic PageView with HTTP 200 before Enable CAPI was switched on for order tests. v1.8.6 also refreshes the dated token badge.
Open the screenshot at full sizeWhat success proves
HTTP 200 with events_received greater than zero confirms acceptance of this event submission. Check the matching PageView in Meta Test Events. It does not prove WooCommerce Purchase delivery, browser Pixel tracking or browser/server deduplication.
Read Valid in context. The badge means Meta accepted a test submission with the current token and Pixel ID at the shown time. It is not a continuing validity guarantee or proof of Purchase delivery. Continue with browser setup and an order test.
STEP 05
Configure the WooCommerce data layer
1. Install GTM4WP. Activate Google Tag Manager for WordPress from the WordPress plugin directory. In Settings > Google Tag Manager, add your site's GTM container ID and save. Avoid installing the same container twice through another theme, plugin or snippet.
2. Enable ecommerce. In the GTM4WP WooCommerce section, switch Track e-commerce on. This supplies the WooCommerce ecommerce data layer for the provided browser workflow. Server-side CAPI sending works independently of GTM4WP.
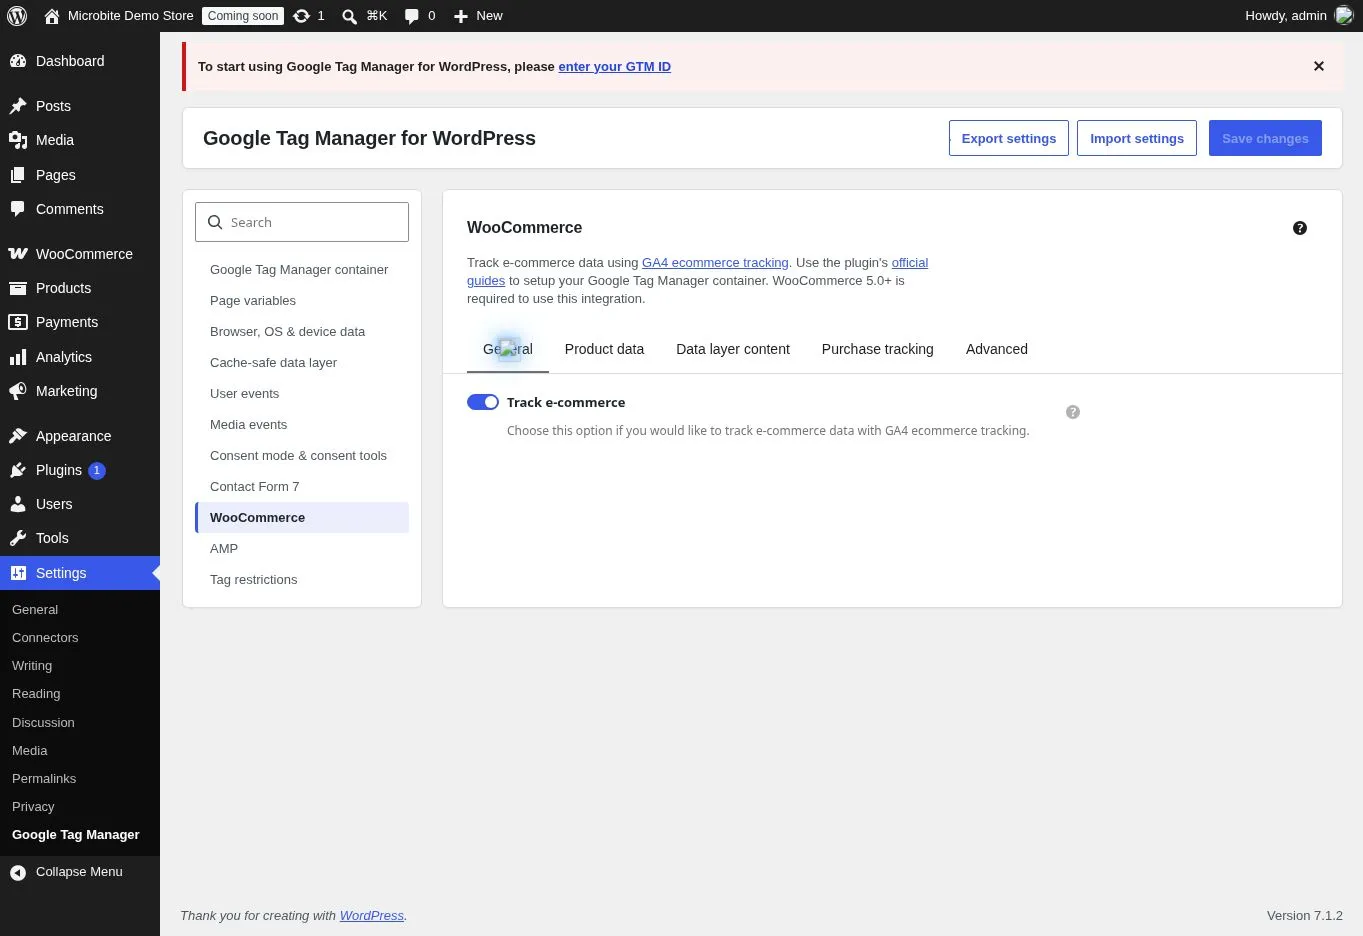
GTM4WP 2.0.5 WooCommerce integration with Track e-commerce enabled. The setup banner in this captured view is not the final verification of the container ID.
Open the screenshot at full size3. Check Purchase tracking. Leave the transaction ID prefix blank for this configuration. Use the order statuses needed by your checkout; the demo used Processing, On hold and Completed. Compare the actual browser transaction ID with the CAPI order number, especially if you use custom order numbering.
Verify in GTM Preview. Browse a product, add it to the cart, open checkout and complete a test order. Look for view_item, add_to_cart, begin_checkout and purchase, including the transaction ID, value, currency and items. Keep optional customer and order details out of the data layer unless your measurement setup requires them.
STEP 06
Import and publish Meta with GA4
1. Export a backup. In GTM, export the existing container before importing. Download the supplied JSON from the plugin Instructions tab or use the reviewed package prepared for your site. The Universal bundle has more features than the demo's seven-tag setup.
2. Merge into an existing container. In Admin > Import Container, choose the file and workspace, then Merge. Overwrite conflicting tags, triggers and variables affects matching resources; Overwrite the entire container replaces the container. Check every conflict and the preview for unintended deletions. Use a whole-container overwrite only for an intentionally empty container.
3. Set the correct IDs and event ID. Update the Meta Pixel ID and optional GA4 ID constants. In the Meta Purchase tag, map Event ID to the data-layer variable for ecommerce.transaction_id. The variable name can differ between bundles. It must equal the CAPI order number for that purchase. Pause unused Google Ads or other destination tags.
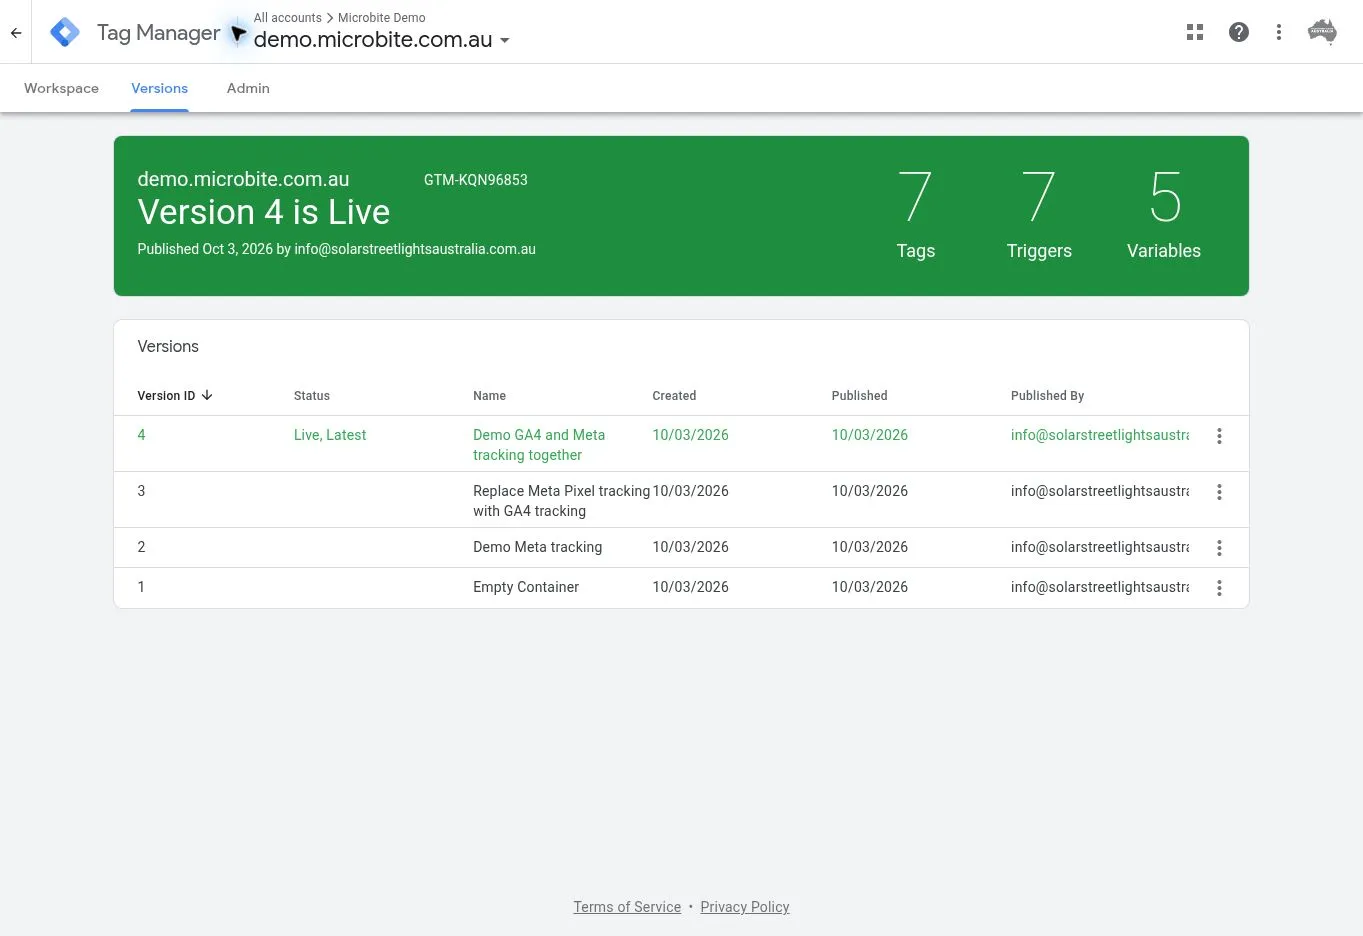
Published demo version 4 contains Meta and GA4 together: seven tags, seven triggers and five custom variables. This is a demo package, not the full Universal container.
Open the screenshot at full size4. Preview, then publish. Check the funnel, destination IDs and tag firing before Submit > Publish. Confirm the intended version is Live. An imported or saved workspace alone does not change the tags served to normal visitors.
STEP 07
Place a safe test order
1. Keep the test views open. Leave Meta Test Events open for the selected dataset. Start GTM Preview on the same store to inspect the browser Purchase tag. Confirm the plugin has Enable CAPI and Test Mode on, with the current code saved.
2. Complete a fresh checkout. Use a staging store, synthetic details and a test payment method. Do not rely on refreshing an old order confirmation page; Purchase duplicate guards may stop a resend. Record the order number, total and currency.
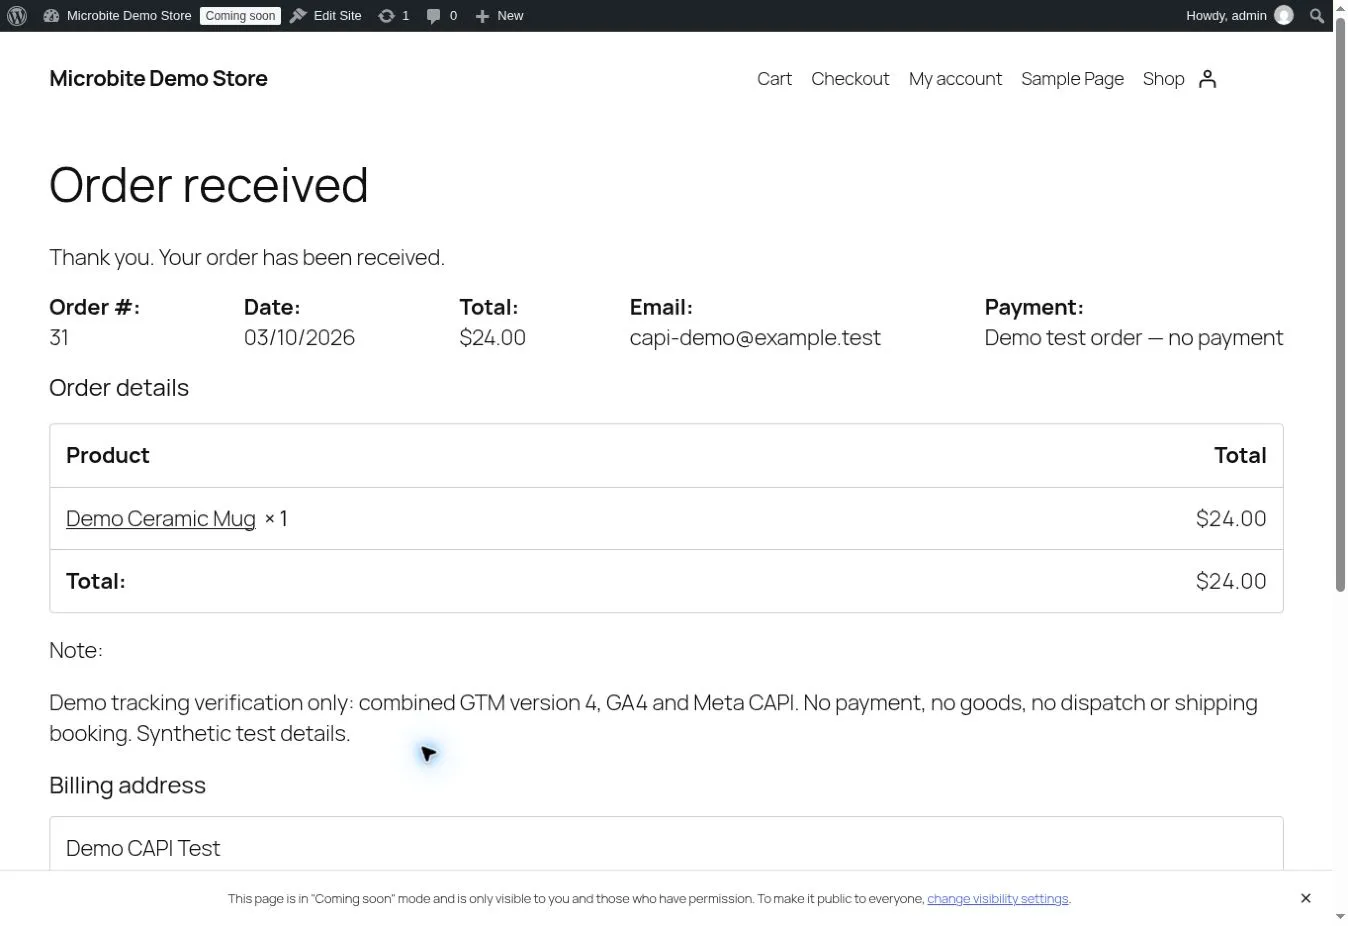
Demo order 31 contains one mug for A$24 using a no-payment demonstration method. This screenshot contains synthetic contact details only.
Open the screenshot at full size3. Check the server receipt. Open WooCommerce > Status > Logs, choose the mbcapi source for the test date, and locate the order. Sends use Action Scheduler, so they can arrive after checkout. The demo receipt was:
Order 31 Purchase event_id=31 -> HTTP 200; events_received: 1
What this proves
The order was created and Meta accepted its server Purchase. The checkout page and server log alone do not prove that a browser Purchase arrived or that Meta deduplicated the two events.
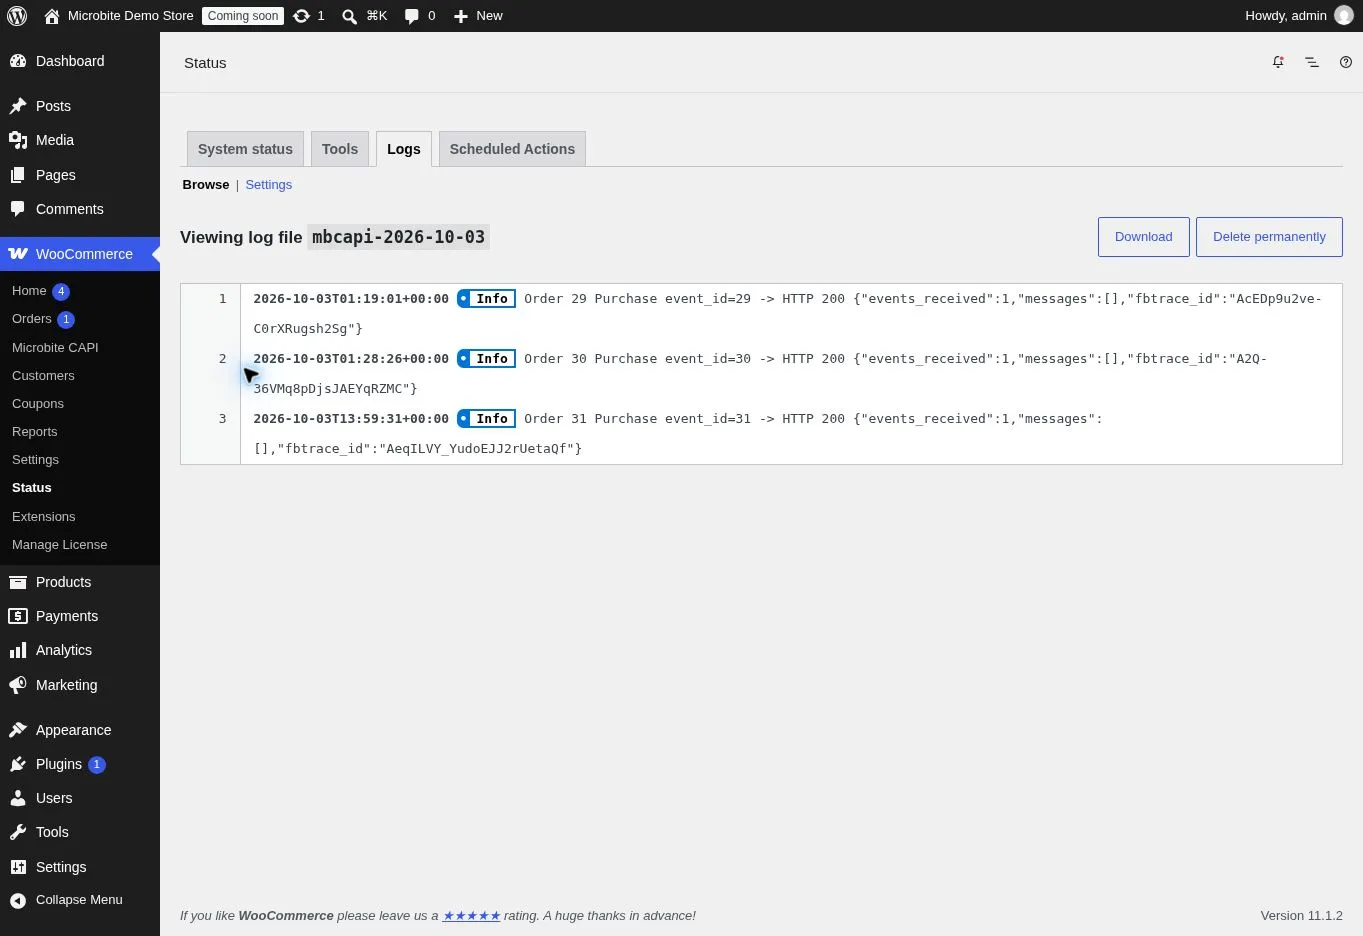
WooCommerce log for the synthetic demo orders. HTTP 200 with events_received 1 confirms server acceptance, not browser/server deduplication.
STEP 08
Verify Meta Purchase and deduplication
1. Confirm Server Purchase. In Meta Test Events, select the same dataset and inspect the Purchase. Check Received from, Event ID, value and currency. The completed demo test below is order 33 for A$24 AUD.
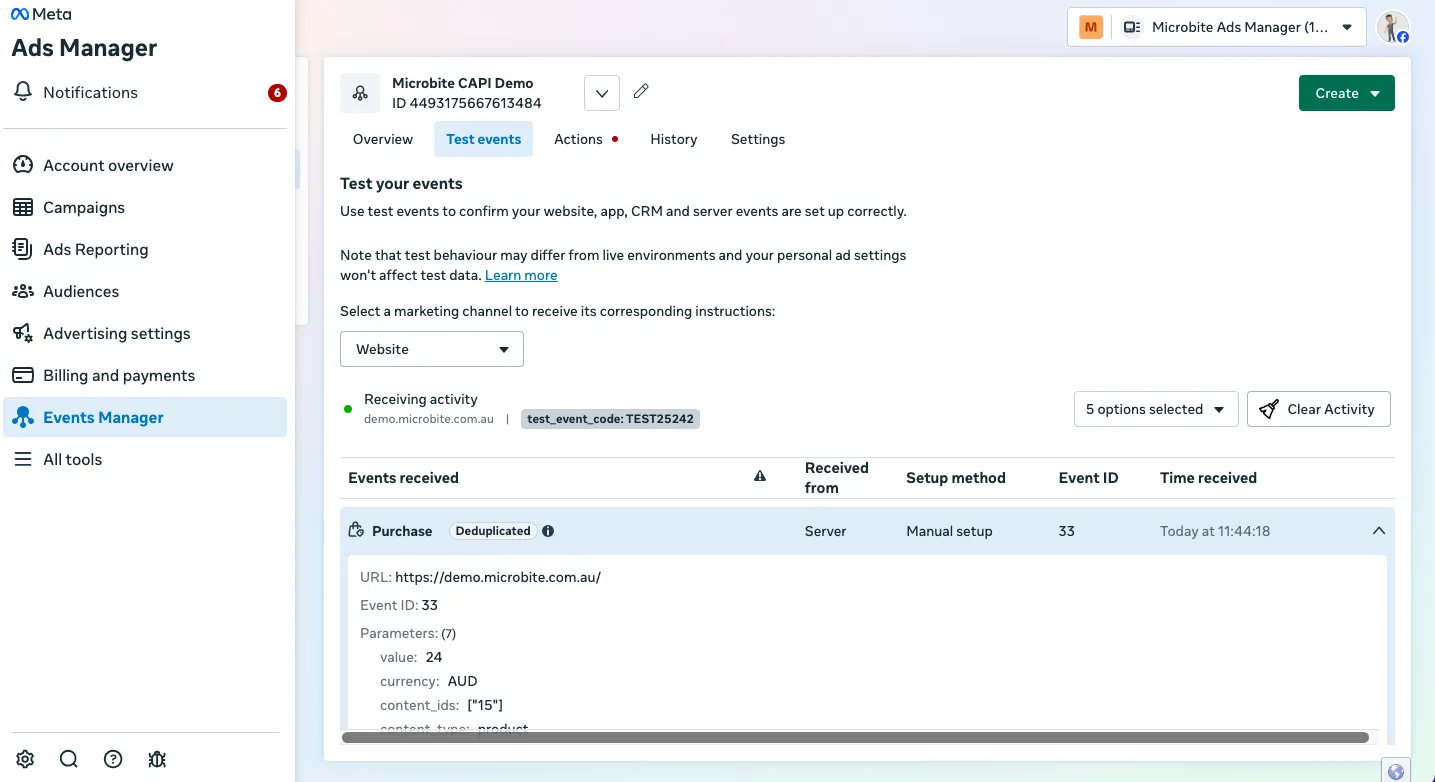
Meta Test Events marks Purchase 33 Deduplicated, with value 24 and currency AUD. Original demo screenshot supplied 4 October 2026. Click the image to open it at full size.
Open the screenshot at full size2. Check the browser Purchase tag for the same order. Select purchase in GTM Preview and check that Meta Purchase succeeds. Confirm it uses the same Pixel ID and that its Event ID exactly matches the CAPI order number, including any prefixes. In this demo, the resolved Pixel ID was 4493175667613484 and the Event ID was 33. The screenshot below shows the selected purchase event, rather than totals for the entire session.
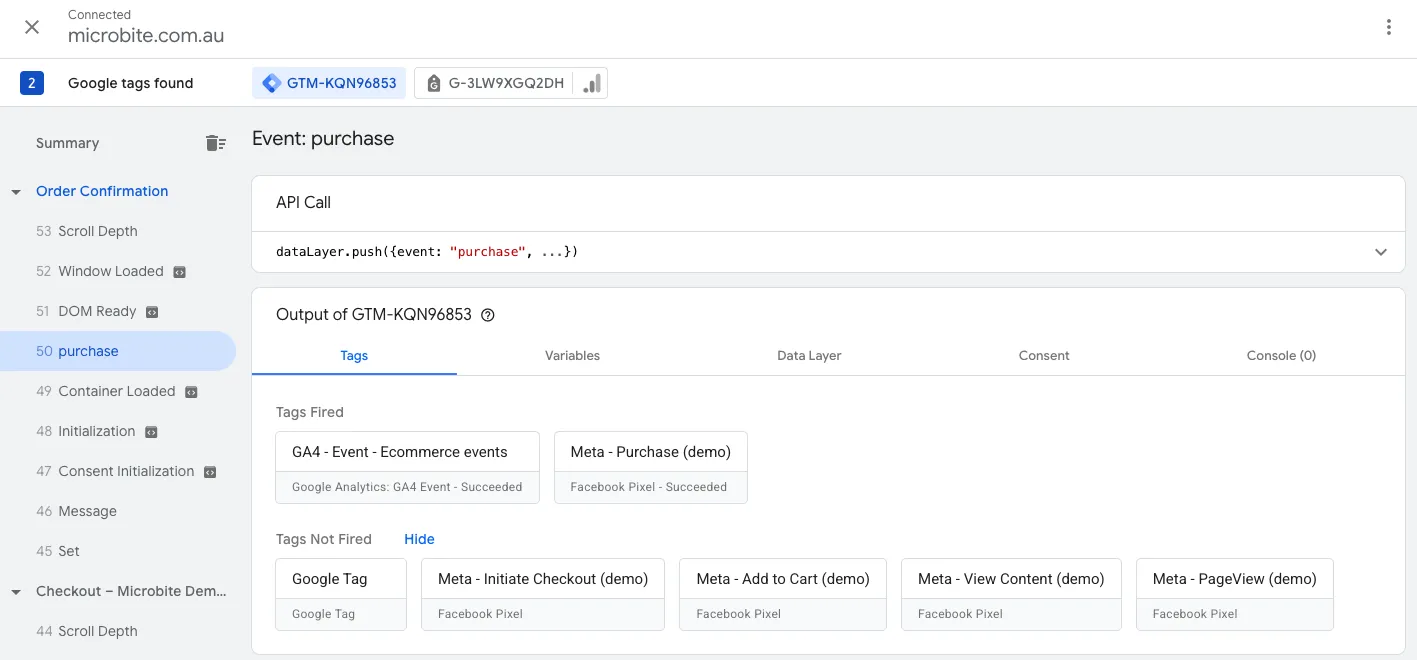
The selected purchase event shows Meta Purchase and GA4 ecommerce tags Succeeded. Check tag firing separately from destination receipt. Click the screenshot to open the original at full size.
Meta event name
Browser: Purchase
Server: Purchase
Destination
Browser: Your selected Pixel ID
Server: Same Pixel or dataset ID
Order 33 example ID
Browser: 33, confirmed in the resolved Purchase tag
Server: 33, shown in Meta Test Events
3. Check Meta's deduplication result. Matching settings alone do not prove receipt. Inspect the event status and deduplication diagnostics available in your account. Here, Meta explicitly reported Deduplicated for Purchase 33, alongside the successful browser tag and matching event ID. One visible entry does not mean failure, and two separately Processed rows are not required. A repeat purchase by the same buyer should have a new event ID: orders 30 and 33 are different purchases.
STEP 09
Add and verify optional GA4 tracking
1. Use your web stream. In GA4 Admin > Data streams, open the website stream and copy its G-... Measurement ID. Configure one Google tag for that destination in GTM; review existing direct gtag or plugin installs to avoid duplicate collection.
2. Send ecommerce events. Configure the GA4 Event tag with Event Name {{Event}}, Send Ecommerce data enabled, and Data Layer as its source. Use the standard ecommerce custom events, including purchase. Purchase needs transaction_id, value, currency and items. Merge these resources alongside Meta, then preview and publish.
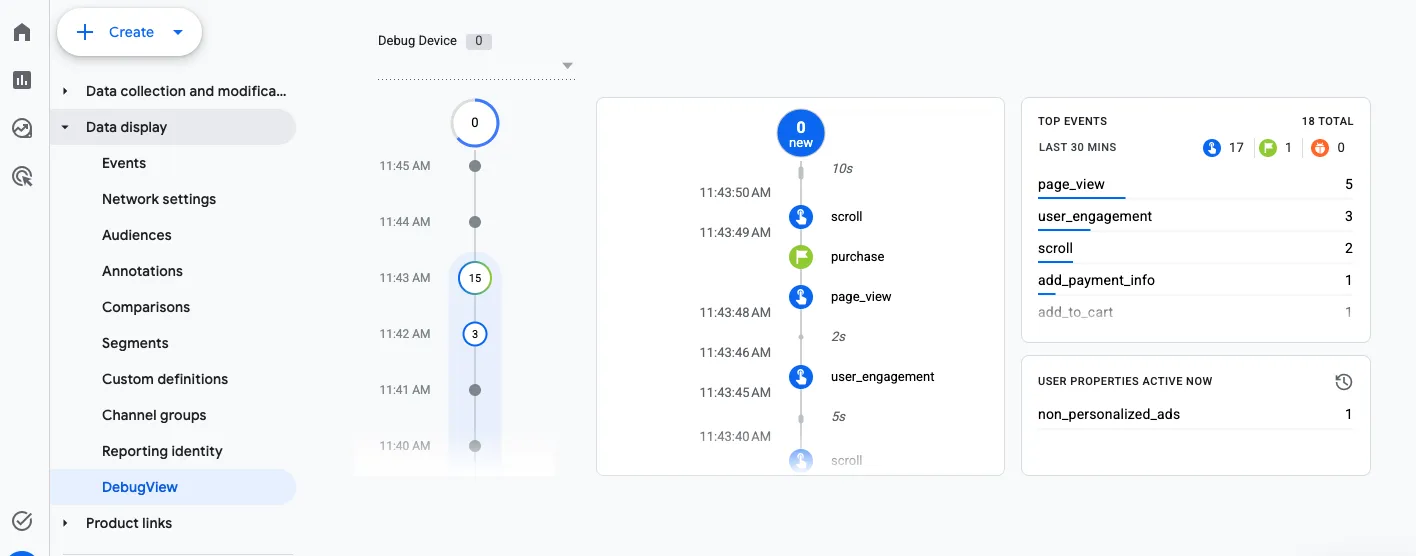
GA4 DebugView shows the received purchase event in the demo timeline. Select purchase to inspect its parameters, as shown below. Click the image to open it at full size.
Open the screenshot at full size3. Verify receipt, not just firing. With GTM Preview connected, open GA4 Admin > Data display > DebugView in the correct property. Select purchase and expand transaction_id, value and currency. Check items separately. Normal ecommerce reports can update later; Realtime page views alone do not verify revenue tracking.
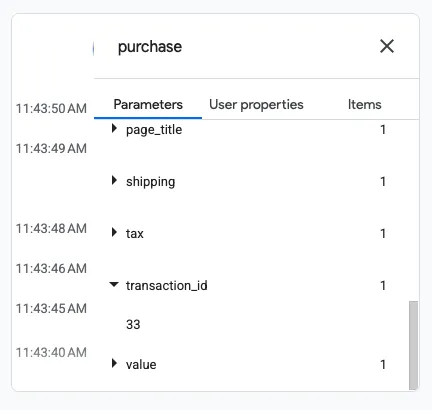
transaction_id: 33 - matches the WooCommerce order number.
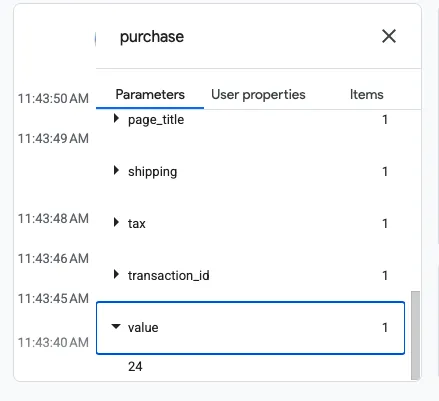
value: 24 - matches the demo order total.
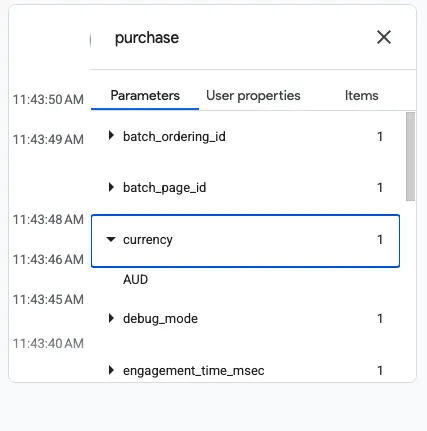
currency: AUD - matches the order currency.
Demo result: GA4 Purchase received
The original screenshots confirm transaction_id 33, value 24 and currency AUD for the demo purchase. Measurement ID G-3LW9XGQ2DH is a demo example; use your own web stream. These screenshots confirm the three expanded parameters, so check items separately in your own test. GA4 transaction deduplication is separate from Meta browser/server deduplication.
STEP 10
Troubleshoot and prepare production
Token field looks blank
v1.8.6 shows stars when saved; the earlier interface clears the entry field. Check the plugin version and saved status before replacing your token.
Missing Permission
Correct dataset, token app and assigned assets; validate event submission before widening access.
PageView succeeds but no Purchase
Enable CAPI, licence, order status, mbcapi log and Scheduled Actions.
Only Server Purchase appears
GTM live version, Pixel ID, browser trigger, consent state, blockers and data layer.
Two Purchase signals do not match
Same Purchase name, destination and exact Event ID; custom order-number prefixes.
GA4 has page views only
purchase data-layer event, GA4 Event tag and received ecommerce parameters.
Before going live
Confirm a fresh WooCommerce server Purchase, a matching browser Purchase and Meta deduplication. If GA4 is installed, verify its received Purchase separately. In the plugin, clear Test Event Code and switch Test Mode off, then save and confirm the persisted values. A non-empty test code is still included by the Purchase sender even if the Test Mode checkbox is off. Clear the code for production; keep a dedicated demo in test mode.
End temporary debugging after verification. Review privacy disclosures and your consent implementation; the plugin does not automatically provide consent management. Customer identifiers are hashed for matching, while fields such as IP address and user agent may be sent without hashing. Server-side CAPI Purchase sending is for WooCommerce orders; SureCart requires its own integration.
Saved token
Fresh v1.8.6 capture shows the fixed mask and dated Valid badge after Meta accepted the diagnostic PageView on 4 October 2026 at 19:02 AEDT.
Diagnostic PageView
Meta accepted one event, HTTP 200
Server WooCommerce Purchase
Orders 29, 30, 31 and 33 received by Meta
Combined Meta and GA4 container
GTM version 4 Live
GA4 page views
Received in Realtime
Browser Purchase and Meta deduplication
Order 33: browser tag succeeded with matching event ID; Meta reported Deduplicated
GA4 Purchase receipt
Received purchase: transaction_id 33, value 24, currency AUD
Further reference
Google Tag Manager container export and import
Google Analytics ecommerce with Tag Manager
Meta Events Manager Conversions API setup help
Keep the illustrated guide handy.
Download the updated eleven-page PDF for the setup checklist, fresh interface screenshots, AI-guided setup workflow and completed order 33 verification example. Your store needs its own licence, Meta dataset and tracking IDs.
Back to Help & setup